
How to deploy a fully controlled, secure AI environment using Ollama and Ubuntu on the Infomaniak Public Cloud.

Note about that post: Some of the command lines below are displayed as images as WordPress does not allow some codes to be displayed as text to avoid any script injection.
Tired of wondering if your private company data is being used to train the next big public AI model? It’s time to move beyond public chatbots. Today, I’ll show you how to leverage Infrastructure as a Service (IaaS) and Ollama to deploy a secure, Swiss-hosted AI environment that keeps your data 100% confidential.
The best part? You can have it fully operational in under 45 minutes:
- Infomaniak – I chose Infomaniak as the foundation for this build for two main reasons: 1. Data Sovereignty: All data and employees are based in Switzerland. For businesses bound by strict privacy regulations, knowing your data never leaves Swiss borders is a massive peace of mind. 2. Simplicity & Value: Their “Public Cloud IaaS” is price-competitive and uses a clear pricing model that’s easy to navigate, even if you aren’t a cloud architect.
- Ubuntu 24.04 LTS
- Ollama
- Microsoft-Phi4 model
- Open WebUI
Setting up the infrastructure
The first thing is to setup your own infrastructure. You can decide to use one or several servers on premise but the cost, especially to begin and test, can quickly be very expensive.
Therefore, I decided to go for Cloud Computing. There are many providers in the market, from giants like AWS, MIcrosoft or Google to mid-size players like Infomaniak or OVH. I have selected Infomaniak for two main reasons:
- All the data is stored in Switzerland and all employees are based in Switzerland. For me, when thinking about a company, it is key to be confident that your data will not be stored in a country that you do not fully trust. I don’t mean that using AWS or Google is unsafe but some companies have to follow regulations that can impose them to have the data stored in Europe for example.
- Infomaniak is price competitive and also easier to understand for a person that has average knowledge like me. Their pricing for Cloud Computing is clear, easy to understand and relatively affordable.
Then, I had to select which service to use from Infomaniak and I decided to go for IaaS (Infrastructure as a Service). Think of Infrastructure as a Service (IaaS) as the digital version of leasing a fully equipped plot of land. You don’t own the ground, the pipes, or the power lines, but you have total freedom to build whatever house you want on top of it.
Below is a matrix that shows what you manage and what Infomaniak manages:
| Infomaniak | You |
| Physical Data Centers | Operating Systems (Windows, Linux) |
| Cooling & Power | Applications & Data |
| Physical Networking | Runtime & Middleware |
| Servers & Storage Hardware | Security Firewalls & Configurations |
To give you a better understanding, see below a visual that represent IaaS (Infrastructure as a Service), PaaS (Platform as a Service) and SaaS (Software as a Service):
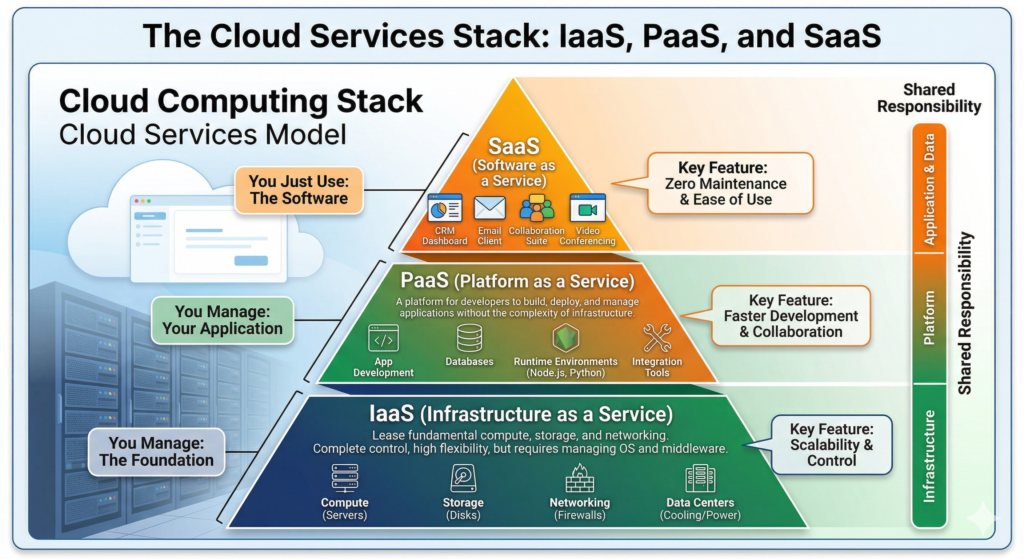
So in a nutshell:
- IaaS is the foundation of the cloud pyramid. It provides the “raw materials” of computing—virtual servers, storage, and networking—without the need for physical hardware. Because you are essentially renting a blank slate, you have the highest level of control and flexibility, but you are also responsible for managing the operating system, security patches, and any software you install. It’s the go-to choice for companies that want to build their own custom digital environments from the ground up.
- PaaS sits in the middle, offering a pre-configured environment specifically for developers. Instead of worrying about server maintenance or OS updates, developers get a “ready-to-code” platform with built-in tools, databases, and runtime environments (like Node.js or Python). This allows teams to focus entirely on writing and deploying applications quickly. It balances control with convenience, removing the “plumbing” of the infrastructure so you can focus on the creative build.
- SaaS is at the top of the pyramid and is the most common cloud service for everyday users. It delivers fully functional software applications directly through a web browser or app. The provider manages everything—from the code and the servers to the data security and updates—meaning you simply log in and use the service. Examples include Gmail, Slack, or Salesforce. It offers the least amount of technical control but the highest amount of ease and accessibility.
I decided to go for IaaS instead of PaaS as I wanted to start from the ground and learn. Obviously, if I would be creating a sensitive and confidential system, I would not rely on me to ensure that proper security is in place and I will never trust myself. However, as this is mainly for education and curiosity perspective, starting with IaaS is the right way to go for me.
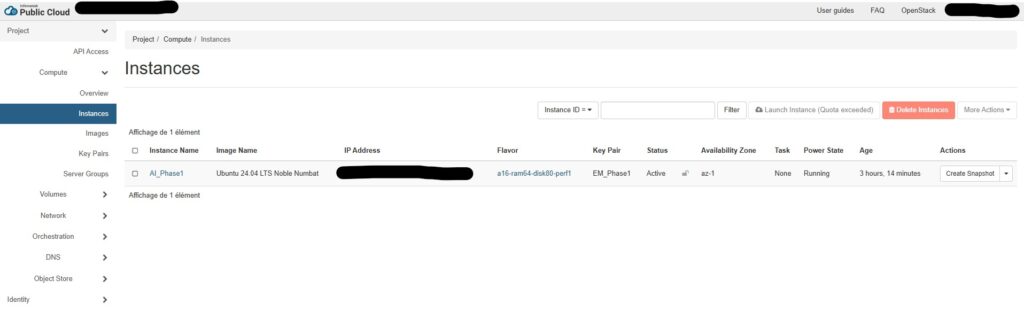
Now that I know what I need, I can go on Infomanaik and subscribe to the right service called “Public Cloud IaaS“. I will not go through all the service registration process as this is quite straightforward. At first, you can only have a limited instance, I went for an instance with 16 VCPUs, 64Gb of RAM and 80Gb of HDD without any GPU, which will prove to be limiting but we will come to that later.
When the setup is completed, you will login (username is your OpenStack ID and password is the password that you have configured when creating the Open Stack ID) to your Public Cloud portal and access the portal below:
Also, during the creation of the instance, you should have created an SSH Key Pair file. This is really critical to save that file somewhere in security as this is what you are going to use to connect via SSH to your instance.
Setting up Networking
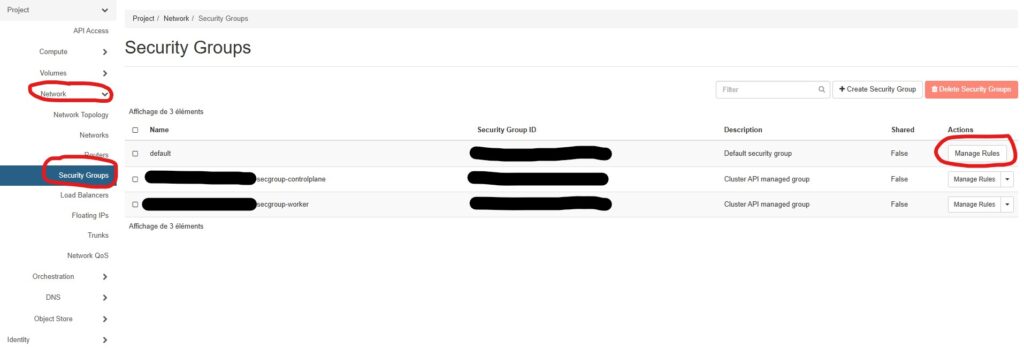
The first thing to do is to configure your network as by default, you cannot ping or access your server via SSH. You will have to go to “Network” and then to “Security Groups” and finally click on the button “Manage Rules” of the line “default”.
Now, you can click on the top right corner on the button “Add Rule” to open the window that will allow you to create new rules.
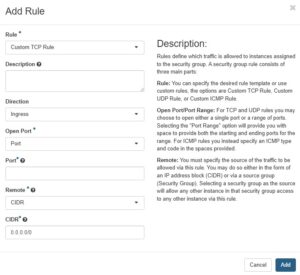
There will be four rules to create:
- Ping – You need to open the port to ping your server. You should select “All ICMP” in the rule dropdown list. Leave everything else by default.
- SSH – You will need to open the port 22 and leave everything by default unless you want to limit (recommended) the SSH access to your own IP address. In that case, replace 0.0.0.0 by your own IP.
- Ollama – Open port 11434 to allow Ollama to run properly. You can also restrict with your IP if you want to restrict the use of Ollama only for your IP.
- Open WebUI – Open port 3000 to allow Open WebUI to run properly. You can also restrict with your IP if you want to restrict the use of Ollama only for your IP.
A table would be very handy as a summary, so here you go:
| Service | Port | Protocl | Recommended settings |
| Ping | N/A | All ICMP | |
| SSH | 22 | TCP | Restrict to your IP |
| Ollama | 11434 | TCP | Restrict to your IP |
| Open WebUI | 3000 | TCP |
Access to your server via SSH
In order to access your server via SSH, you need to open a terminal session (PowerShell on Windows). When your terminal is open, you will have to use the following command line where xxx.xxx.xxx.xxx is your own external IP:

BOOM, you are connected, this is that easy!!!
Installation of Ollama
Installing Ollama is dead easy, you simply have to use the following command line in your terminal when you are connected to your server:

When the install is done, check that Ollama runs on your server by using that command line: ollama --version
If you use an instance with a GPU (much faster), you can check (in a separate Terminal session) if Ollama use the GPU optimization by using nvidia-smi
If you want to expose Ollama to be used remotely by other applications like a browser extension or Open WebUI, you will have to edit the config by using the following command line: sudo systemctl edit ollama.service. This opens a file, please add the following two lines: 1st line: Ini, TOML & second line: Environment="OLLAMA_HOST=0.0.0.0"
Then save the file and restart the services by using those two command lines in sequence: sudo systemctl daemon-reload followed by sudo systemctl restart ollama
Installation of your model (phi-4)
Now, run the following command line ollama run phi4 to install your model, in our case the Microsoft-phi4.
When the install is finished, you will see a prompt >>>, you can now query your model with a question and it will reply to you. You can use the following Commands:
- /? – Will provide with help
- /? shortcuts – Will list all the shortcuts available in Ollama
- /bye – To quit the model and return to your SSH command line
- /show info – Provide information about the model
- /set verbose – Provide details about your request like total duration, load duration, prompt evaluation count (tokens), promt evaluation duration, prompt evaluation rate (tokens), evaluation count (tokens), evaluation duration and evaluation rate (token / second)
Install Docker on your server
It is now time to install Docker so that you can later install Open WebUI. You simply have to use the following command lines in the terminal:

Installation of Open WebUI
Open WebUI is a “Self-hosted Frontend” that allows you to use your instance via a UI very similar to ChatGPT, see below a screen copy of Open WebUI.

Now, use the following command line to activate Open WebUI using port 3000:

Now, you are ready to call Open WebUI using your IP address on port 3000, something like: http://123.123.123.123:3000/
While public chatbots are convenient, the trade-off is often your privacy. By leveraging Ubuntu 24.04 LTS, Ollama, and Open WebUI, you now have a sophisticated interface that rivals the major players—without the data leaks. You have successfully navigated the cloud stack from the ground up.
What’s next for your private AI? Now that your infrastructure is live, you might consider experimenting with different models beyond phi-4. If you found this guide helpful, please share it with your IT team or colleagues who are concerned about AI confidentiality!